


Use Disk Quotas in Dedicated Linux Servers for Plesk Servers
- Use Disk Quotas in Dedicated Linux Servers
- How to Use Disk Quotas in Dedicated cPanel Servers
- Use Disk Quotas in Dedicated Linux Servers for Plesk Servers
Using Disk Quotas on Plesk Servers
Plesk servers come in a variety of underlying operating systems like: Windows, CentOS and Ubuntu VPS's as well as dedicated servers. These systems address disk quotas in different ways. However, they all use the same tools within the Plesk interface. Plesk servers can assign quotas on an individual domain basis or through the Service Plans & Subscriptions system. We will go over both of these methods below.
Plesk Initial Quota Setup
As with any server, we will need to initialize the quota setup so disk quotas can be tracked. How this is done depends on the underlying operating system. We have included instructions for initializing our Fully Managed CentOS 7 Plesk servers.
CentOS 7
The following outline shows the initial setup of quotas on our Fully Managed Plesk Onyx 17 servers, running the CentOS 7 Linux distribution. Thees servers do not have quotas enabled by default.
1. Login to our server via SSH.
2. We must determine the DEVICENAME of the drive that requires quotas. This is done by running the below command.
/usr/local/psa/admin/sbin/usermng --isquotableExample Output:
~ $ /usr/local/psa/admin/sbin/usermng --isquotable
usermng: Userquota is not enabled on device: /dev/vda3
usermng: Userquota is not enabled on device: /dev/vda3
1We can see our DEVICENAME for use later is: /dev/vda3
3. Now we need to use the DEVICENAME to identify the UUID for this device. This is done by passing the DEVICENAME along to the following command.
Blkid DEVICENAMEExample Output:
~ $ blkid /dev/vda3
/dev/vda3: UUID="7d7a2cb2-4ef6-42e2-998a-86d6373f5cd1" TYPE="ext4" PARTLABEL="primary" PARTUUID="da626122-0dbe-461e-93af-a7ae3f43f2e4"We note the UUID of DEVICENAME is 7d7a2cb2-4ef6-42e2-998a-86d6373f5cd1.
4. At this stage we have identified the drive by both DEVICENAME and UUID. Next we open the /etc/fstab config file in our preferred editor. We then identify the lines in the config containing either of our UUID or DEVICENAME.
Example by UUID:
~ $ cat /etc/fstab

#
# /etc/fstab
# Created by anaconda on Tue Apr  4 14:11:03 2017
#
# Accessible filesystems, by reference, are maintained under '/dev/disk'
# See man pages fstab(5), findfs(8), mount(8) and/or blkid(8) for more info
#
UUID=7d7a2cb2-4ef6-42e2-998a-86d6373f5cd1 /         ext4  defaults    1 1
UUID=54cda6e8-74f4-40a9-a79a-e288ed321a3e swap      swap  defaults    0 0
Example by DEVICENAME:
~ $ cat /etc/fstab
#
# /etc/fstab
# Created by anaconda on Tue Apr 4 14:11:03 2017
#
# Accessible filesystems, by reference, are maintained under '/dev/disk'
# See man pages fstab(5), findfs(8), mount(8) and/or blkid(8) for more info
#
/dev/vda3 / ext4 defaults 1 1
/dev/vaa2 swap swap defaults 0 05. Modify the identified line(s) by appending a usrquota flag onto their defaults flag. Make sure each flag is separated by only a single comma like our example.
Example by UUID:
~ $ cat /etc/fstab

#
# /etc/fstab
# Created by anaconda on Tue Apr  4 14:11:03 2017
#
# Accessible filesystems, by reference, are maintained under '/dev/disk'
# See man pages fstab(5), findfs(8), mount(8) and/or blkid(8) for more info
#
UUID=7d7a2cb2-4ef6-42e2-998a-86d6373f5cd1 /       ext4	defaults,usrquota   1 1
UUID=54cda6e8-74f4-40a9-a79a-e288ed321a3e swap 	  swap	defaults    	0 0
Example by DEVICENAME:
~ $ cat /etc/fstab
#
# /etc/fstab
# Created by anaconda on Tue Apr 4 14:11:03 2017
#
# Accessible filesystems, by reference, are maintained under '/dev/disk'
# See man pages fstab(5), findfs(8), mount(8) and/or blkid(8) for more info
#
/dev/vda3 / ext4 defaults,usrquota 1 1
/dev/vaa2 swap swap defaults 0 0Save our changes to the /etc/fstab config file.
6. Next we remount the file system to make it aware of the changes.
mount -o remount /Example Output:
~ $ mount -o remount /7. We will need to install the quota system package. We use the YUM package manager in our example.
yum install quota -yExample Output:
~ $ yum install quota -y
Dependencies Resolved
=============================================================
Package Arch Version Repository Size
=============================================================
Reinstalling:
quota x86_64 1:4.01-14.el7 system-base 179 k
Transaction Summary
=============================================================
Reinstall 1 Package
Total download size: 179 k
Installed size: 887 k
Downloading packages:
quota-4.01-14.el7.x86_64.rpm | 179 kB 00:00
Running transaction check
Running transaction test
Transaction test succeeded
Running transaction
Installing : 1:quota-4.01-14.el7.x86_64 1/1
Verifying : 1:quota-4.01-14.el7.x86_64 1/1
Installed:
quota.x86_64 1:4.01-14.el7
Complete!8. Next, prepare quota files. This is done by running the following command.
/sbin/quotacheck -cfmvF vfsv0 /Example Output:
~ $ /sbin/quotacheck -cfmvF vfsv0 /
quotacheck: Your kernel probably supports journaled quota but you are not using it. Consider switching to journaled quota to avoid running quotacheck after an unclean shutdown.
quotacheck: Scanning /dev/vda3 [/] done
quotacheck: Old group file name could not been determined. Usage will not be subtracted.
quotacheck: Checked 22834 directories and 123065 files9. We can now turn on the quota system.
quotaon DEVICENAMEExample Output:
~ $ quotaon /dev/vda310. The Plesk interface will not see quotas are enabled until we Refresh Plesk Components. This can be done simply by restarting the Plesk service.
/etc/init.d/psa restartExample Output:
~ $ /etc/init.d/psa restart11. Finished. Disk Quotas should now be available throughout the Plesk interface.
Plesk Service Plans & Subscriptions
Plesk provides quota management through Service Plans & Subscriptions. These features allow the creations of predefined Plans to control a site’s limitations, including disk quotas. Plans can be added, removed, edited, or deleted. We get started by logging into Plesk and creating a Service Plan.
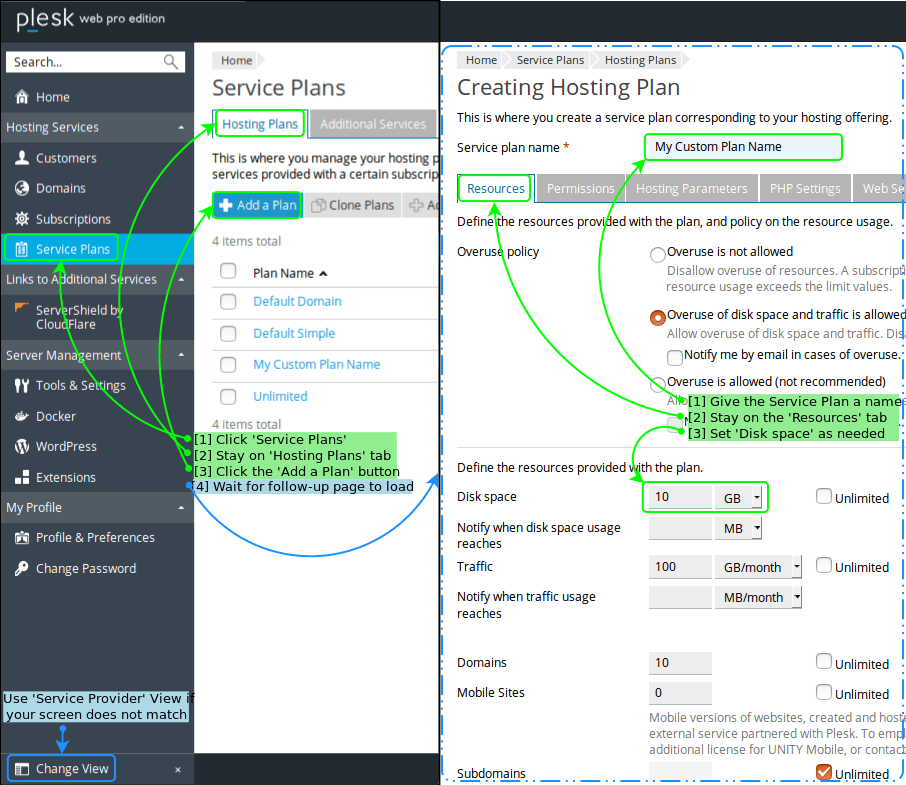
Creating a Service Plan in Plesk
- Click Service Plans.
- Stay on the Hosting Plans tab
- Click the Add a Plan button
- Wait for follow-up page to load.
- Give the Service Plan a name
- Stay on the Resources tab
- Set Disk space as needed
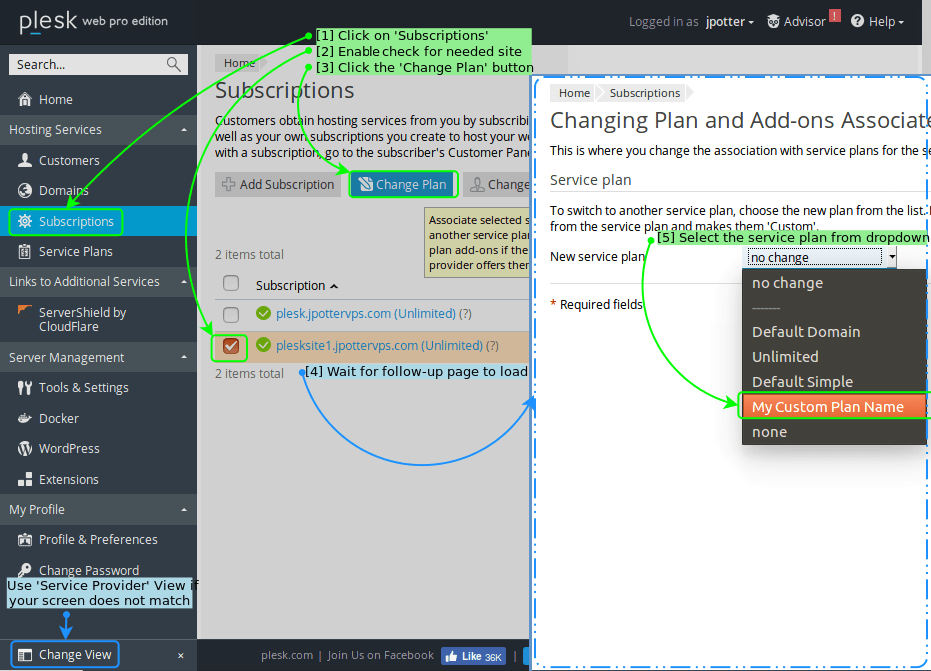
Assign Sites to Service Plan Subscriptions
- Click on Subscriptions.
- Enable check for needed site.
- Click the Change Plan button.
- Wait for follow-up page to load.
- Select the service plan from dropdown.
Plesk Planless Quotas
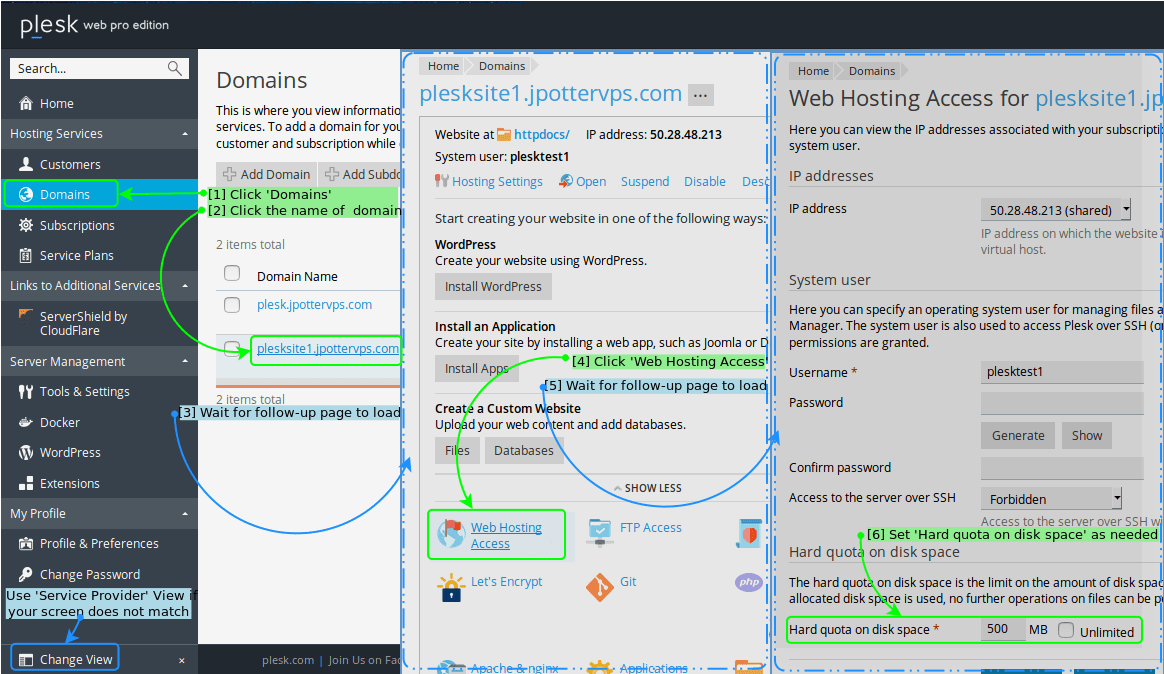
Service Plans & Subscriptions are not mandatory for disk quotas. We can also assign quotas on select domains, circumventing the need for a Service Plan. This may be preferred on smaller servers hosting only a few sites versus configuring Service Plans for only a few users.
Planless Quotas in Plesk
- Click on Domains.
- Click the name of the domain to change.
- Wait for the Domain page to finish loading.
- Click on Web Hosting Access.
- Wait for the Web Hosting Access page to finish loading.
- Set Hard quota on disk space as needed.
How can we help?
Sonar Monitoring
All of our servers come with free Sonar Monitoring. Our talented Sonar Monitoring administrators handle alerts when servers reach critical thresholds. The team will alert you to any servers that are running low on disk space. We don't stop there! These talented administrators will login and examine the server. We can identify common issues that lead to space overconsumption. This includes cleaning up system files and logs that are no longer needed. Reach out to our Support team today if you have any questions.
Related Articles:


About the Author: Jason Potter
A veteran of the IT Support field, I have more than a decade of experience in systems administration, web hosting, and cPanel servers. I enjoy writing and providing complicated technical concepts in layman terms. On my free time, I enjoy playing several types video games, automation scripting and just living life with my wife and two kids.


Our Sales and Support teams are available 24 hours by phone or e-mail to assist.
Latest Articles
Useful Features in cPanel for Your Sites
Read ArticleUseful Features in cPanel for Your Sites
Read ArticleHow to Clone a Drupal Site to Another Domain
Read ArticleAccessing Man Pages on Ubuntu 16.04 LTS
Read ArticleWhat is VMware Fusion?
Read Article